Default Pi Info
Raspberry Pi OS Lite versions
The Lite versions of Raspberry Pi OS are very basic. There is no desktop or GUI of any kind. And it does not include the educational or productivity software included with the Desktop version. So the Lite versions are therefore only suitable to use headless.Since the Lite version came out I embraced this version. No overhead of all the graphic stuff, which I never use anyway.
Raspberry Pi 5 & M.2 NVMe
See RPi 5 M2 NVMe SSD page! (Read further)- How to update eeprom firmware
- Check the bootloader version
- Update to the latest version
- Check if the update was successful
- Enable PCIe
- Enable PCIe 3 Mode
- Formatting the NVMe and booting from NVMe
Basic installation OS
- Download the latest Raspberry Pi OS version
- Backup Raspberry Pi OS from microSD card to harddisk
- WINDOWS: Win32DiskImager.exe. Download the latest version
- LINUX: sudo dd if=/dev/sdc of=/home/pi/backup.img
- During first boot, Raspberry Pi OS expect an IP address from a DHCP server
piuser has been removed. (Read further)
So with this latest release (2022-04-04-raspios-bullseye version),
the default “pi” user is being removed,
and instead you will create a user the first time you boot a newly-flashed Raspberry Pi OS image.
For people who run their Raspberry Pi headless and therefore cannot work through the wizard,
the Raspberry Pi Imager tool allows you to preconfigure an image with a user account.
logged in as the user created in the Imager.
Install Raspberry Pi OS using Raspberry Pi Imager
- Windows/Mac/Linux: Download the latest version Raspberry Pi Imager
- Download and install Raspberry Pi Imager to a computer with an SD card reader
- Put the SD card you'll use with your Raspberry Pi into the reader and run Raspberry Pi Imager
Navigation tab GENERAL
Enable Set username and password
:

Navigation tab SERVICES
Enable SSH
:
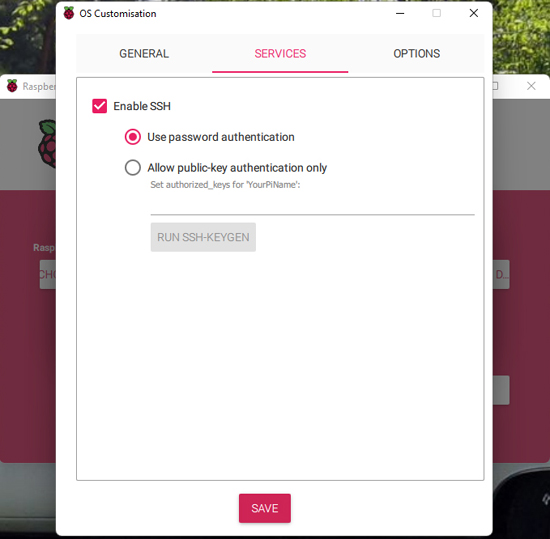
Along with any other preconfiguration you want.
$ sudo raspi-config
- System options
- Change Password
- Hostname (not necessary per se)
- Interface options
- SSH on
- All other interfaces (depends on your project)
- Localisation Options
- Change Locale (if you like your Pi in English, you can leave it as is)
- Change timezone
- Advanced options
- Expand filesystem
- Bootloader version - Select latest
Change basic settings OS Bullseye (Read further)
$ sudo raspi-config
- System options
- Change Password
- Hostname (not necessary per se)
- Interface options
- SSH on
- All other interfaces (depends on your project)
-
Performance Options
- GPU Memory, zero MB, use headless
- Localisation Options
- Change timezone
- Change Locale (if you like your Pi in English, you can leave it as is)
- Advanced options
- Expand filesystem
With the release of Raspberry Pi OS Bookworm, networking on the Raspberry Pi was changed to use NetworkManager
as the standard controller for networking, replacing the previous dhcpcd system. NetworkManager includes a command line tool called nmcli
,
which can control NetworkManager and report on the network status.
In this tutorial, we will use nmcli
to configure the network to use a static IP address.
Run the following command in a terminal to display a list of available network interfaces:
$ sudo nmcli -p connection show
You should see a listing like the one below:
======================================
  NetworkManager connection profiles
======================================
NAME                UUID                                  TYPE      DEVICE
-----------------------------------------------------------------------------
Wired connection 1  bd220d18-7d6a-36a5-9820-4f67de2c01fc  ethernet  eth0
lo                  c29ba7c5-98ff-4fa0-8d8e-06b30b8ec384  loopback  lo
The default name for the wired ethernet connection is Wired connection 1.
Now we know the name of the network connection we want to update,
we can send three commands to set the new IP address, Gateway and DNS server.
New IP address:
$ sudo nmcli c mod "Wired connection 1" ipv4.addresses 192.168.1.2/27 ipv4.method manual
Gateway:
$ sudo nmcli con mod "Wired connection 1" ipv4.gateway 192.168.1.1
DNS servers:
$ sudo nmcli con mod "Wired connection 1" ipv4.dns "1.1.1.1,1.0.0.1"
When you have finished updating the network settings on your Raspberry Pi,
you can restart the network connection with the following command:
$ sudo nmcli c down "Wired connection 1" && sudo nmcli c up "Wired connection 1"
Note: If you are using SSH to connect to your Raspberry Pi,
running the above command will cause the SSH session to end if the IP address changes.
You can find all of the configuration settings for a network connection with the following command:
$ nmcli -p connection show "Wired connection 1"
To change the network connection from static to automatic, run the following commands:
$ sudo nmcli con modify "Wired connection 1" ipv4.method auto
$ sudo nmcli c down "Wired connection 1" && sudo nmcli c up "Wired connection 1"
Set a static IP Address on Raspberry Pi OS Bullseye (Read further)
Alternatively, if you are running an older version of Raspberry Pi OS such as Buster,
then you would create a dhcpcd.conf
file instead.
Check the current network interface:
$ ifconfig
The ouput gives something like this:
eth0: flags=4163<UP,BROADCAST,RUNNING,MULTICAST>  mtu 1500
inet 192.168.1.30  netmask 255.255.255.224  broadcast 192.168.1.31
eth0 is the current wired interface name.
Before you begin with the assignment of a private IP address for Raspberry Pi,
check whether DHCPCD is already activated using the following command:
$ sudo service dhcpcd status
In case it’s not, activate DHCPCD as follows:
$ sudo service dhcpcd start
$ sudo systemctl enable dhcpcd
Now make sure that the configuration of the file /etc/network/interfaces has the original status.
For this, the iface
configuration needs to be set at ‘manual’ for the interfaces.
For the editing of the activated DHCPCDs,
start by opening the configuration file /etc/dhcpcd.conf and running the following command:
$ sudo nano /etc/dhcpcd.conf
Should look something like this:
interface eth0
static ip_address=192.168.1.5/24
static routers=192.168.1.1
static domain_name_servers=1.1.1.1 1.0.0.1
Reboot
$ sudo nano /boot/firmware/config.txt
Add three lines to [all], then save and reboot
# turn wifi and bluetooth off
dtoverlay=disable-wifi
dtoverlay=disable-bt
Switch off BT (bluetooth) & Wifi (>2 pi) Bullseye (Read further)
$ sudo nano /boot/config.txt
Add three lines to the bottom of the file, then save and reboot
# turn wifi and bluetooth off
dtoverlay=disable-wifi
dtoverlay=disable-bt
NTP client
$ sudo nano /etc/systemd/timesyncd.conf
[Time]
NTP=10.1.1.10
FallbackNTP=0.nl.pool.ntp.org 1.nl.pool.ntp.org
Reboot
Update and Upgrade Raspberry Pi OS
$ sudo apt-get update && sudo apt-get full-upgrade -y
Reboot
Unlike Debian, Raspberry Pi OS is under continual development.
As a result, package dependencies sometimes change,
so you should always use full-upgrade
instead of the standard upgrade
.
Using apt-cache commands to search for packages
I’ll be honest with you, this is not my preferred way of searching for packages. But this comes in pretty handy when you are looking for some specific library.All you need to do is to use the following command (you don’t even need sudo here):
$ apt-cache search <search term>
You don’t need to know the exact name of the package.
It searches in package names and their short descriptions, and shows result based on that.
How to install new packages with apt-get?
If you know the name of the package, you can easily install it using the command below:$ sudo apt-get install <package_name>
Just replace the <package_name> with your desired package.
How to install multiple packages
You are not restricted to installing just one package at a time. You can install several packages at a time by providing their names:$ sudo apt-get install <package_1> <package_2> <package_3>
What if you run install on an already installed package?
Suppose you already have a package installed, but you used the install command for it anyway. apt-get will actually look into the database, and if a newer version is available, it will upgrade the installed package to the newer one. So no harm is done by using this command - unless you don’t want the package to be upgraded.
How to remove installed packages with apt-get
Installing packages isn’t the only thing you can do with apt-get. You can also remove packages with it. All you need to do is to use the command in this manner:$ sudo apt-get remove <package_name>
Auto-completion works here as well. So just start typing package name and press tab,
and it will suggest all the installed packages starting with those letters.
Another way of uninstalling packages is to use purge. The command is used in the following manner:
$ sudo apt-get purge <package_name>
What is the difference between apt-get remove and apt-get purge?
- apt-get remove just removes the binaries of a package. It doesn’t touch the configuration files
- apt-get purge removes everything related to a package, including the configuration files
So if you have removed
a particular piece of software and then install it again,
your system will have the same configuration files. Of course, you will be asked to override
the existing configuration files when you install it again.
How to clean your system with apt
You can still use the autoremove option and free up some diskspace:$ sudo apt autoremove
This command removes libs and packages that were installed automatically to satisfy the dependencies of an
installed package. If the package is removed, these automatically installed packages,
though useless, remains in the system.
This must be accepted explicitly before updates for this repository can be applied. See apt-secure (8) manpage for details.do we get an error message? (Read further)
If there is a major change in your Debian system - so you don't just need to upgrade one or two sub-versions - you will get an error message during a smooth upgrade. So it was with me when I picked up the Debian 10 is my perfect server virtual machine and I wanted to update. On the machine a luggage racks they were still up-to-date on March 2021, 6, so my system missed a major update.
The solution
In short, this switch allows the update command to continue downloading data from repositories where release information has changed.
In the present example, for Debian 10, the stable
version has changed to the oldstable
version.
Of course, only the names of the releases will change here, and our packages will be updated in the same way as before.
So run the repository update again with the --allow-releaseinfo-change
option:
$ sudo apt-get update --allow-releaseinfo-change
From now on, the update will go as usual. For example, if you run the refresh command again smoothly:
$ sudo apt-get update && sudo apt-get upgrade -y
Shutdown and Reboot
$ sudo shutdown -h now
$ sudo reboot
Nano, texteditor:
CTRL O = save$ ^O
CTRL X = exit
$ ^X
CTRL W = search
Check permissions in Octal (0755 etc):
$ stat -c '%A %a %n' file/dir_name
Raspberry Pi Model Information
With the latest version of Raspberry Pi OS you can also retrieve the Pi model as a string by using :$ cat /proc/device-tree/model
This will output the model information. For example :
Raspberry Pi 3 Model B Plus Rev 1.3
How to check if you are using a 32-Bit or 64-Bit version of Raspberry Pi OS
All you need to do to print the Raspberry Pi OS’s architecture is to use the following command in the terminal.We use the
-moption to tell the command to print out the architecture. Using this,
we can tell whether you are running a 32-bit or 64-bit operating system:
$ uname -m
Or:
$ getconf LONG_BIT