M.2 NVMe for Raspberry Pi 5
Add super-fast storage to your Raspberry Pi 5 allowing for lightning fast boots, NAS use, and applications.
If you're planning on sourcing your own NVMe SSD, then bear in mind the following:
- The SSD needs to be NVMe M.2. Don't get this confused with the SATA M.2, which may look similar but are not compatible. NVMe and SATA refer to the interface communications standards, and M.2 to the form factor.
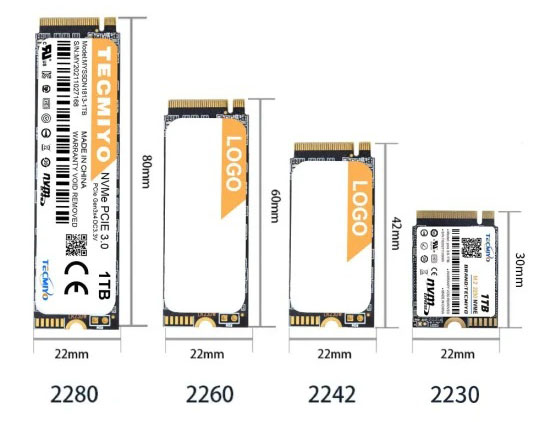
- The NVMe can take SSDs of physical sizes between 2230 and 2280. This refers to the size of the board - i.e. 22mm wide by 30mm to 80mm long.

How to update eeprom firmware
Firstly check the bootloader version:
$ vcgencmd bootloader_version
Maybe the result is following:
pi@raspberrypi:~ $ vcgencmd bootloader_version
2024/05/17 12:29:43
version 72caf66729df313801bcefe9b1ff7099c71bb5ce (release)
timestamp 1715945383
update-time 1716260490
capabilities 0x0000007f
2024/05/17is the firmware version.
Update to the latest version
Before starting the update, make sure raspberry pi 5 is connected to the Internet.-
Update via command (copy-paste line by line):
$ sudo apt update$ sudo apt full-upgrade$ sudo rpi-eeprom-update -
If a firmware update is available you will be prompted to install it and your Raspberry Pi will reboot.
Use tool raspi-config to update:sudo raspi-configThen select Advanced Opitions - Bootloader Version - Latest - answer Yes
Check if the update was successful
After restarting, run the vcgencmd bootloader_version command again to view the firmware version and check whether the update is successful:$ vcgencmd bootloader_version
Update and Upgrade Raspberry Pi OS
$ sudo apt-get update && sudo apt-get full-upgrade -y
Enable PCIe
By default the PCIe connector is not enabled.Add the follow line to the [all] section at the end of your Raspberry Pi /boot/firmware/config.txt file:
$ sudo nano /boot/firmware/config.txt
Then add the following:
[all]
# PCIe Mode
dtparam=pciex1
Save and reboot
Use the lspci command to display your PCIe devices:
$ lspci
PCIe 3 Mode
[WARNING: The Raspberry Pi 5 is not certified for Gen 3.0 speeds, and connections to PCIe devices at these speeds may be unstable.]
To enable experimental and not-officially-supported PCIe 3 mode,add the follow line to the [all] section at the end of your Raspberry Pi /boot/firmware/config.txt file:
$ sudo nano /boot/firmware/config.txt
like this:
[all]
# PCIe 3 Mode
dtparam=pciex1_gen=3
Save and reboot - your drive is ready to use!
Set NVMe early in the boot order
The PCIe connection should work after a reboot, but your Pi won't try booting off an NVMe SSD yet (at least, if there are any other boot devices present!). For that, you need to change the BOOT_ORDER in the Raspberry Pi's bootloader configuration.Edit the EEPROM on the Raspberry Pi 5:
$ sudo rpi-eeprom-config --edit
Change the BOOT_ORDER line to the following:
BOOT_ORDER=0xf416
Add the following line if using a non-HAT+ adapter:
PCIE_PROBE=1
Press Ctrl-O, then enter, to write the change to the file.Press Ctrl-X to exit nano (the editor).
Formatting the NVMe and booting from NVMe
If you want to boot from the NVMe drive, follow these extra steps:
- Make sure your firmware is updated as above!
- Format the drive using Raspberry Pi Imager
- You can do this with your NVMe installed by booting the RPi 5 from SD card and running Raspberry Pi Imager from the start menu.
- Open a Terminal
- Run:
$ sudo raspi-config - Choose Advanced Options - Boot Order - NVMe/USB boot
- Reboot your RPi 5
If you have easy access to your SD card slot you could turn off your Pi, pop out the SD card and (if everything's working as expected) it should automagically boot from your NVMe drive the next time you start it up.